Hide User from GAL
The following ONLY applies to the Cloud Hybrid environment type. For Clients with any other environment type, this article is not applicable.
You may on a rare occurrence see the error message below displayed in the Pia Chatbot when Pia attempts to hide the user from the Global Address List:
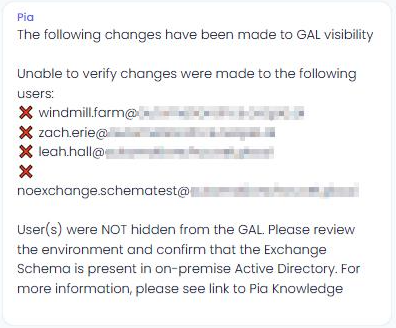
This typically means that the Exchange Schema is not present on the On-Premise Active Directory. To hide a user from the Global Address List(GAL), we set the attribute "msExchHideFromAddressLists" property to a boolean value of True.
This attribute only exists in the Active Directory Schema if the Exchange Schema is added to the Active Directory Forest. To verify this is the case, you can follow the steps on this article:
Find the current Active Directory Schema version | Microsoft Learn
If the three methods of finding the Exchange Schema Version show that the Exchange Schema is not present in the Active Directory, you have two options:
Option 1: Prepare Active Directory for Exchange Server (You do not need to Install Exchange Server as a part of this).
Option 2: Configure a custom attribute mapping between On-Prem AD and Azure (Entra).
- Option 1
- Option 2
Step 1: Follow the steps in this Microsoft Article to add the Exchange Schema.
Step 2: Re-test offboarding a user and confirm that the user is now hidden from the Global Address List
Listed below are instructions for how to configure a custom attribute mapping between On-Prem AD and Azure (Entra).
There are two sets of instructions: one for Azure AD Connect Sync and one for Entra Cloud Sync. Please follow the instructions which are applicable to your client's environment.
Azure AD Connect Sync
Step 1: Enabling Directory extensions and selecting attributes to Sync. Please follow this Microsoft Article to do so: Directory Extension attribute sync
For the purposes of our example today, we will be using the extensionAttribute1.
Step 2: Use the sync rules editor to create your custom mapping. Please see the article below on how to do so: Microsoft Entra Connect Sync: Make a change to the default configuration.
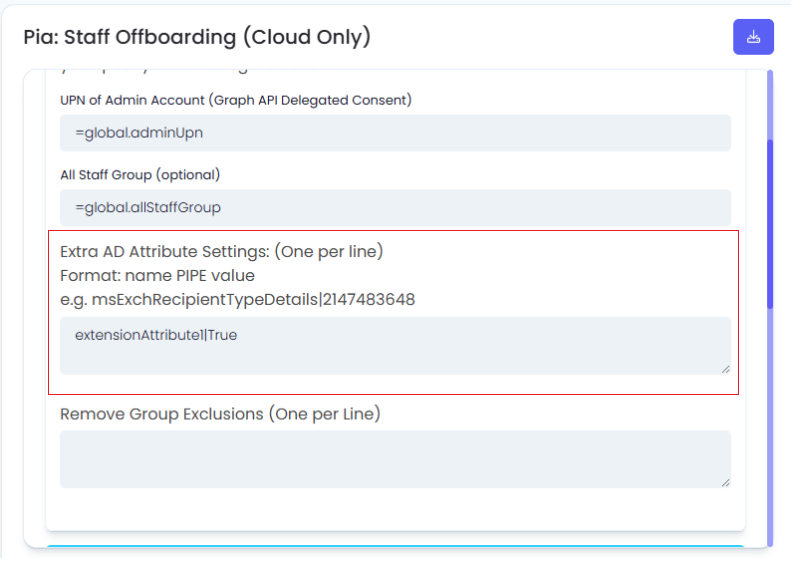
Step 3: Go to the Staff Offboarding Package Configuration for the Client and define the attribute that you have configured the custom mapping for with a value 'True' as per the example in the screenshot below.
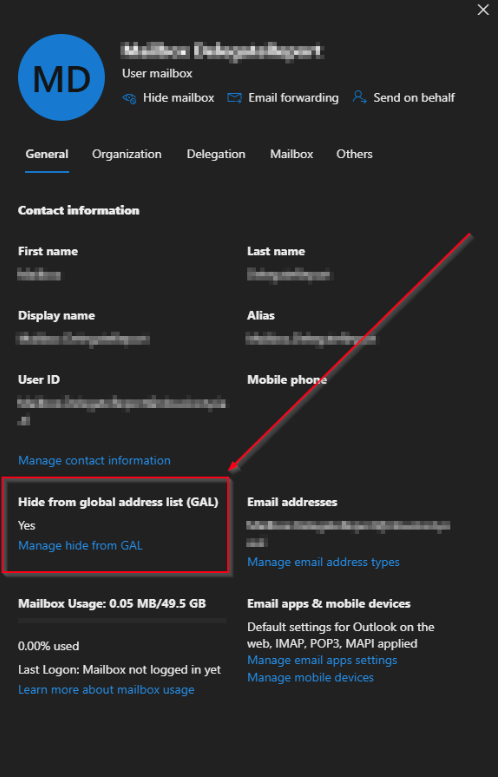
Step 4: Check the user in Office 365 Exchange Admin Centre and confirm that Hide from Global Address (GAL) List is set to 'Yes'.
Azure AD Cloud Sync
Step 1: Please follow this Microsoft Article to configure attribute mapping: Directory Extension attribute sync
For the purposes of our example today, we will be using the extensionAttribute1.
Step 2: Go to the Staff Offboarding Package Configuration for the Client and define the attribute that you have configured the custom mapping for with a value 'True' as per the example in the screenshot below.

Step 3: Check the user in Office 365 Exchange Admin Centre and confirm that Hide from Global Address (GAL) List is set to 'Yes'.
